Cooking can no doubt be considered both an art and a science. If you’ve ever made fresh cheese (ricotta, paneer, chèvre), then you’ve witnessed the magic of science firsthand by adding an acid to the milk and watching it separate into curds and liquid whey. Making tofu (soybean curds) follows this same principle.
In a nutshell, tofu is made by mixing freshly prepared soy curds with a coagulant. Tofu can be made with either crystallized or liquid nigari, which is composed primarily of magnesium chloride and produced by the extraction of salt from seawater. When nigari is added to soy milk, it separates into bean curds and whey. The curds are strained and pressed, and, voilà, you have tofu. It’s as straightforward as that.
But is all this effort worth it, especially given how tofu is available in health food cooler cases, food co-ops, and basically all major grocery stores? That’s what you really want to know, right?
Tofu might not be something you’ll make every day, but just like most things made from scratch, homemade tofu is a tradition that’s worth preserving. First off, the tofu-making process, which dates back nearly 2,000 years to China nearly 2,000 years ago, is fascinating to witness—at least for the inner science geek in some of us. Unfortunately, nearly all tofu made today is mass-produced; artisanal, small-batch tofu is all but a dying art.
From a taste standpoint, the flavor of homemade tofu may not be drastically different from commercial tofu. Tofu has a mildly sweet and nutty flavor. However, the creamy, silken, custardy texture of homemade tofu is memorable and sets it apart from the store-bought stuff. Think freshly made mozzarella versus its mass-produced counterpart. It’s all about that creamy texture, which the highly mechanized, commercial tofu that floods the market today simply does not have. And if you want to experience truly luscious, custardy tofu, then silken tofu is what you’re looking for. Silken tofu requires a slightly different process than pressed tofu. Instead of placing the bean curd in a mold and pressing it, you combine the soy milk with your coagulant, pour into heatproof bowls or ramekins, and steam until set and custardy in texture.
Making your own soy milk isn’t hard, but it does require a bit of patience as the soybeans have to soak overnight.
From a time standpoint, making tofu doesn’t take long, though preparing the soy milk requires a few steps. Yes, you have to make your own soy milk for this to work, as using commercially produced soy milk (like the Silk brand) doesn’t work well due to added preservatives and shelf stabilizers. To make homemade soy milk, you must first soak the soybeans overnight. Look for soybeans (preferably organic and non-GMO) in the bulk section of your grocery store. Then grind the soaked beans in a blender with the soaking water, briefly heat, and then strain. The good thing is that you can make the soy milk a few days in advance and refrigerate it until you’re ready to make tofu.
From a cooking standpoint, tofu is a blank canvas with endless possibilities. You can enjoy your homemade tofu as is, but I like to crisp it up in a hot skillet with a little bit of oil. To accompany your tofu, consider one or more of the simple and tasty dipping sauces listed below. As well, add tofu to miso soup or Korean jjigae stew, mapo tofu (a fiery bowl of Sichuan goodness), stir-fries, or use it to create dessert. Here’s how you can make soy milk (the building block of tofu), firm tofu, and silken tofu at home—with a recipe for pan frying (and sauces) to boot.
FIRM (PRESSED) TOFU
Making tofu from scratch might sound intimidating, but don’t be scared off. The process is easier and quicker than you might think. Preparing the soy milk in advance saves time, such that all you need is 30 to 40 minutes to create a fresh batch of homemade tofu.
Ingredients
2 teaspoons liquid nigari (or 1½ teaspoons nigari crystals)
½ cup filtered or spring water
8 cups soy milk (recipe below)
Equipment: Plastic or wooden tofu mold (alternatively, you can use a small colander) lined with cheesecloth. You can purchase a wooden tofu kit here, which includes a (6.5″ x 5″ x 3.5″) tofu press, tofu press cloth, and enough liquid nigari to produce at least 10 blocks of tofu, or an inexpensive plastic version here. Nigari can be purchased in crystal or liquid form at most Japanese grocery stores, or you can order online here or here (in crystal form) or here (in liquid form).
Directions
1. Combine the nigari and spring water in a small bowl. Stir and set aside.
2. Place the cloth liner (that comes with your kit) or several layers of cheesecloth or unbleached natural muslin inside the tofu mold, allowing the cloth to drape over the sides of the mold. Place the mold on a baking sheet to catch any excess liquid.
3. Heat the soy milk in a large pot over medium-high heat, stirring occasionally with a wood spatula, until it comes to a boil. Reduce the heat to a simmer and cook 5 more minutes, stirring frequently.
4. Remove the pot from the heat and let sit 3 minutes, stirring in a zigzag pattern to prevent a skin from forming and to help the milk cool.
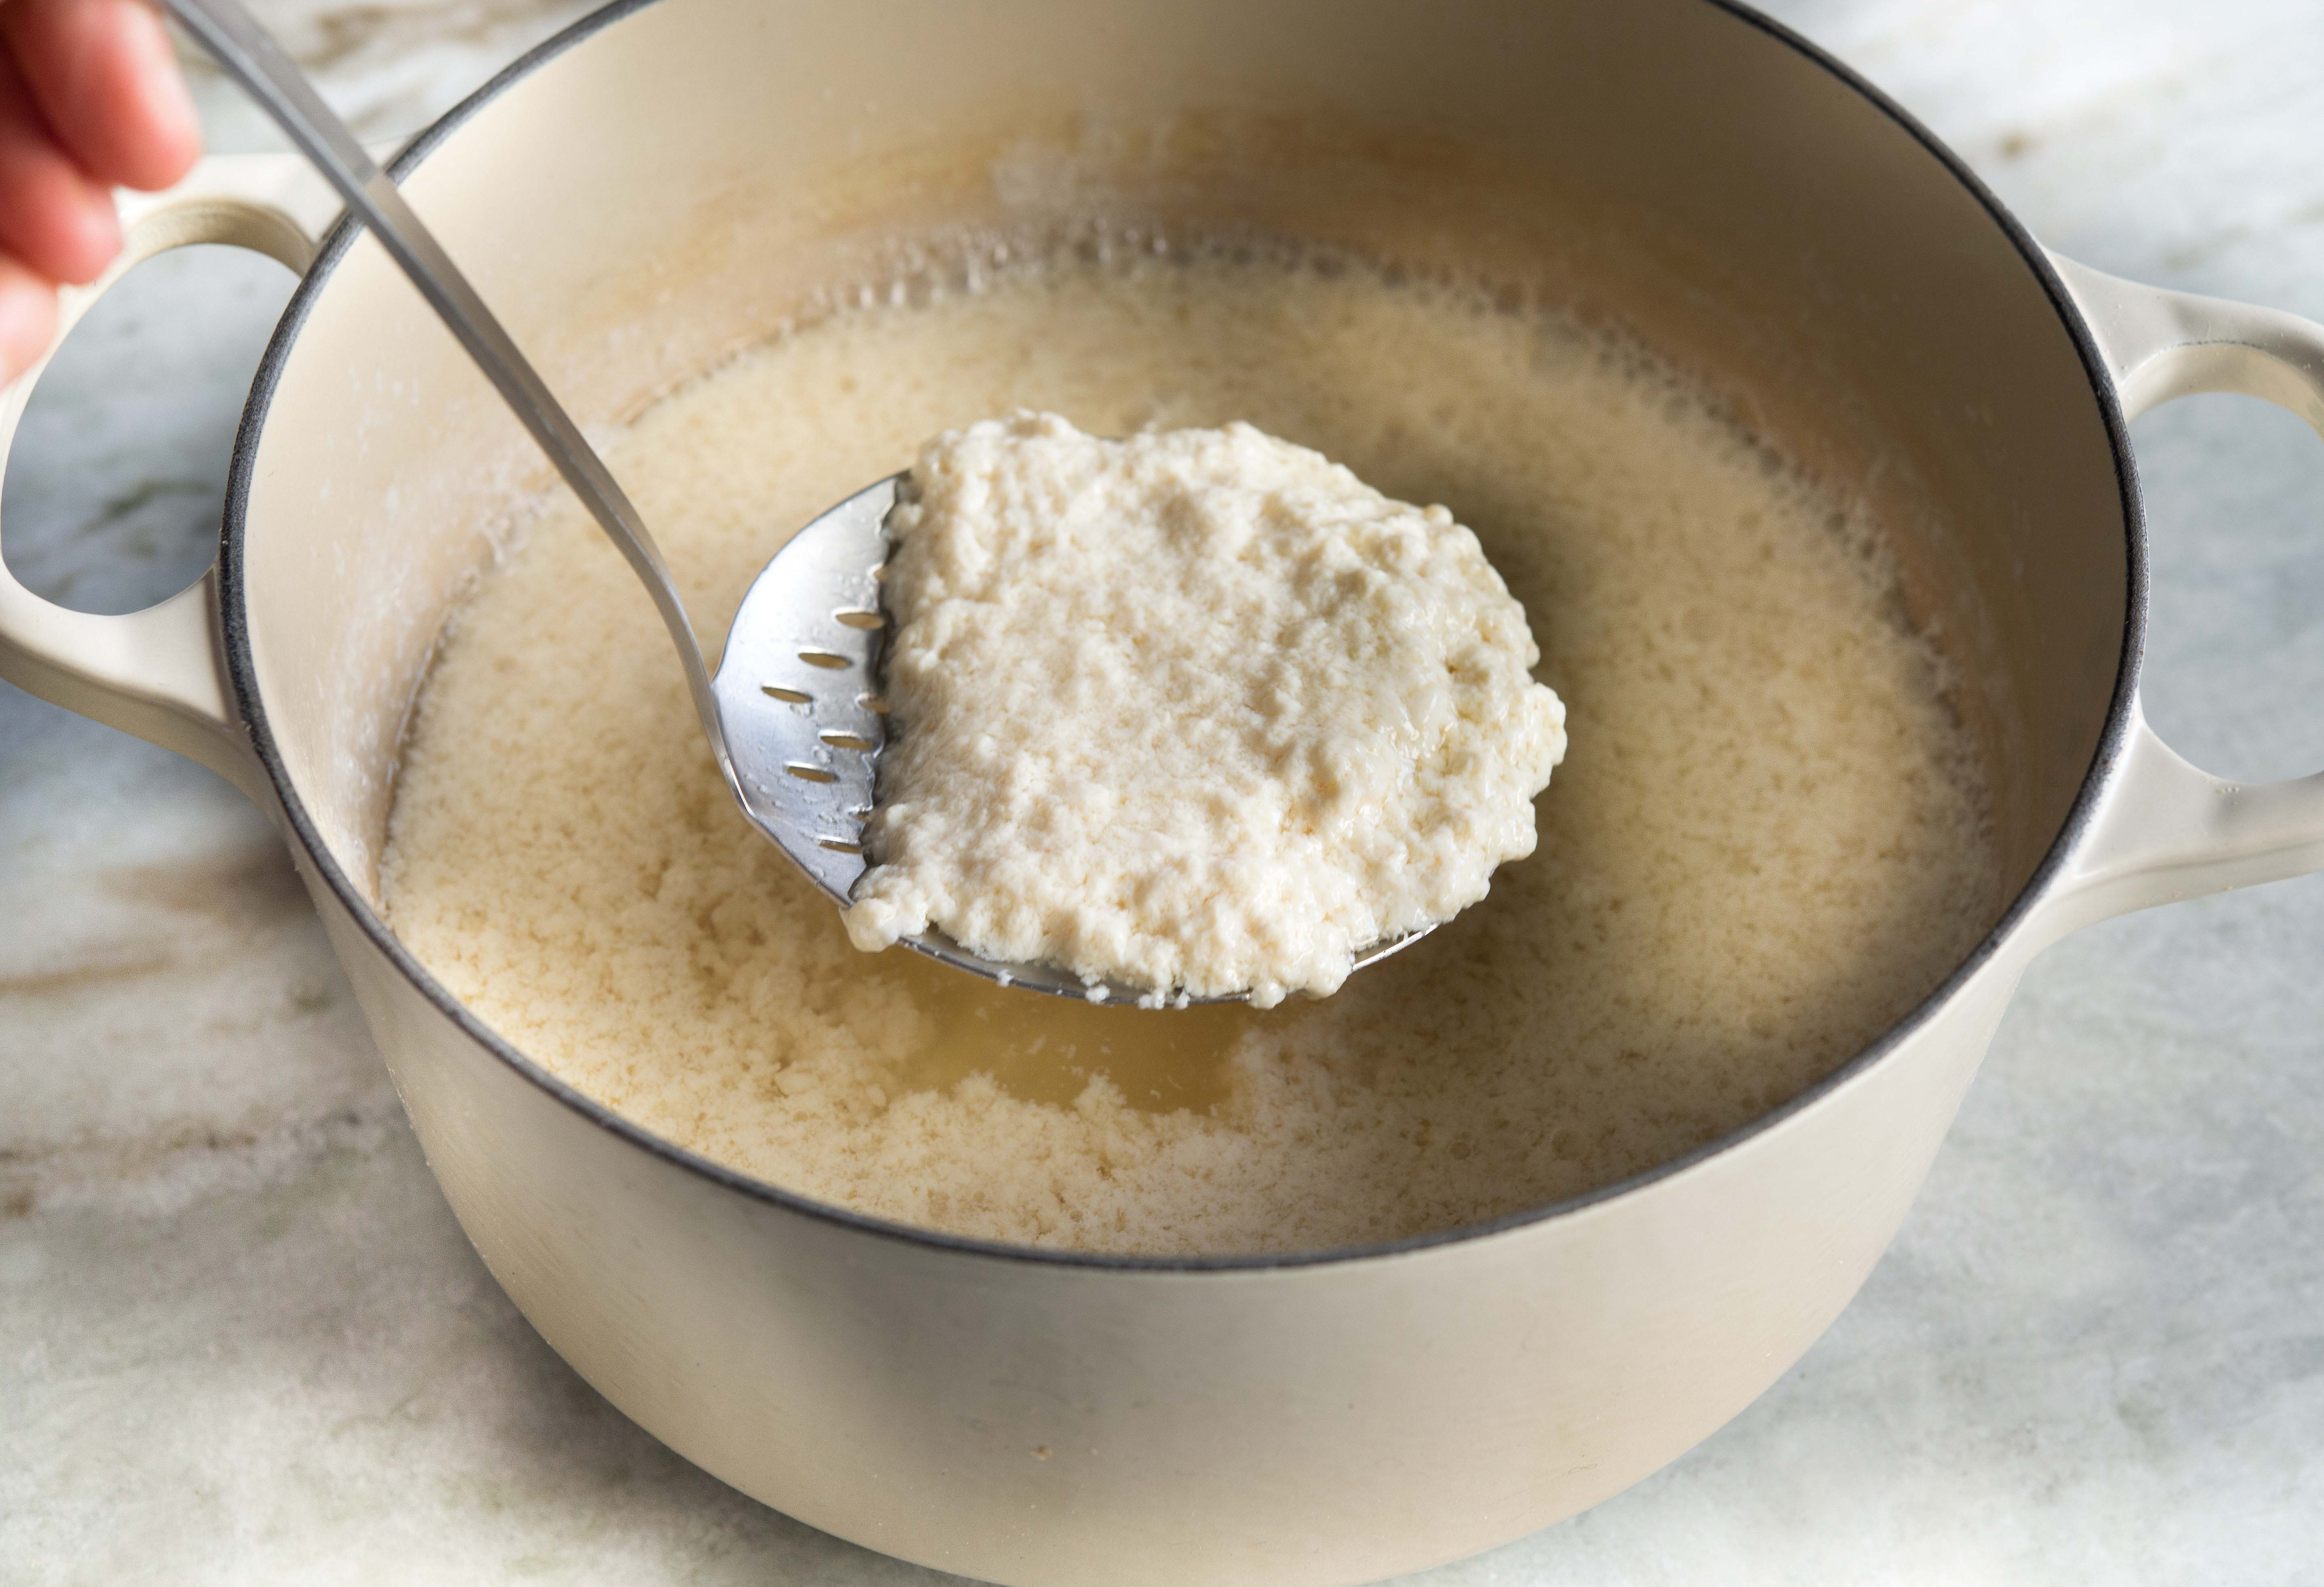
5. Add 1/3 of the nigari mixture and stir to combine. Cover and let rest 3 minutes. Stir vigorously in a zigzag pattern 6 to 8 times, add 1/3 of the nigari mixture, and give it a quick stir. Cover and let rest 3 minutes. Repeat with the last 1/3 of the nigari liquid. Cover and let rest 3 minutes. You should now have bean curds and whey.
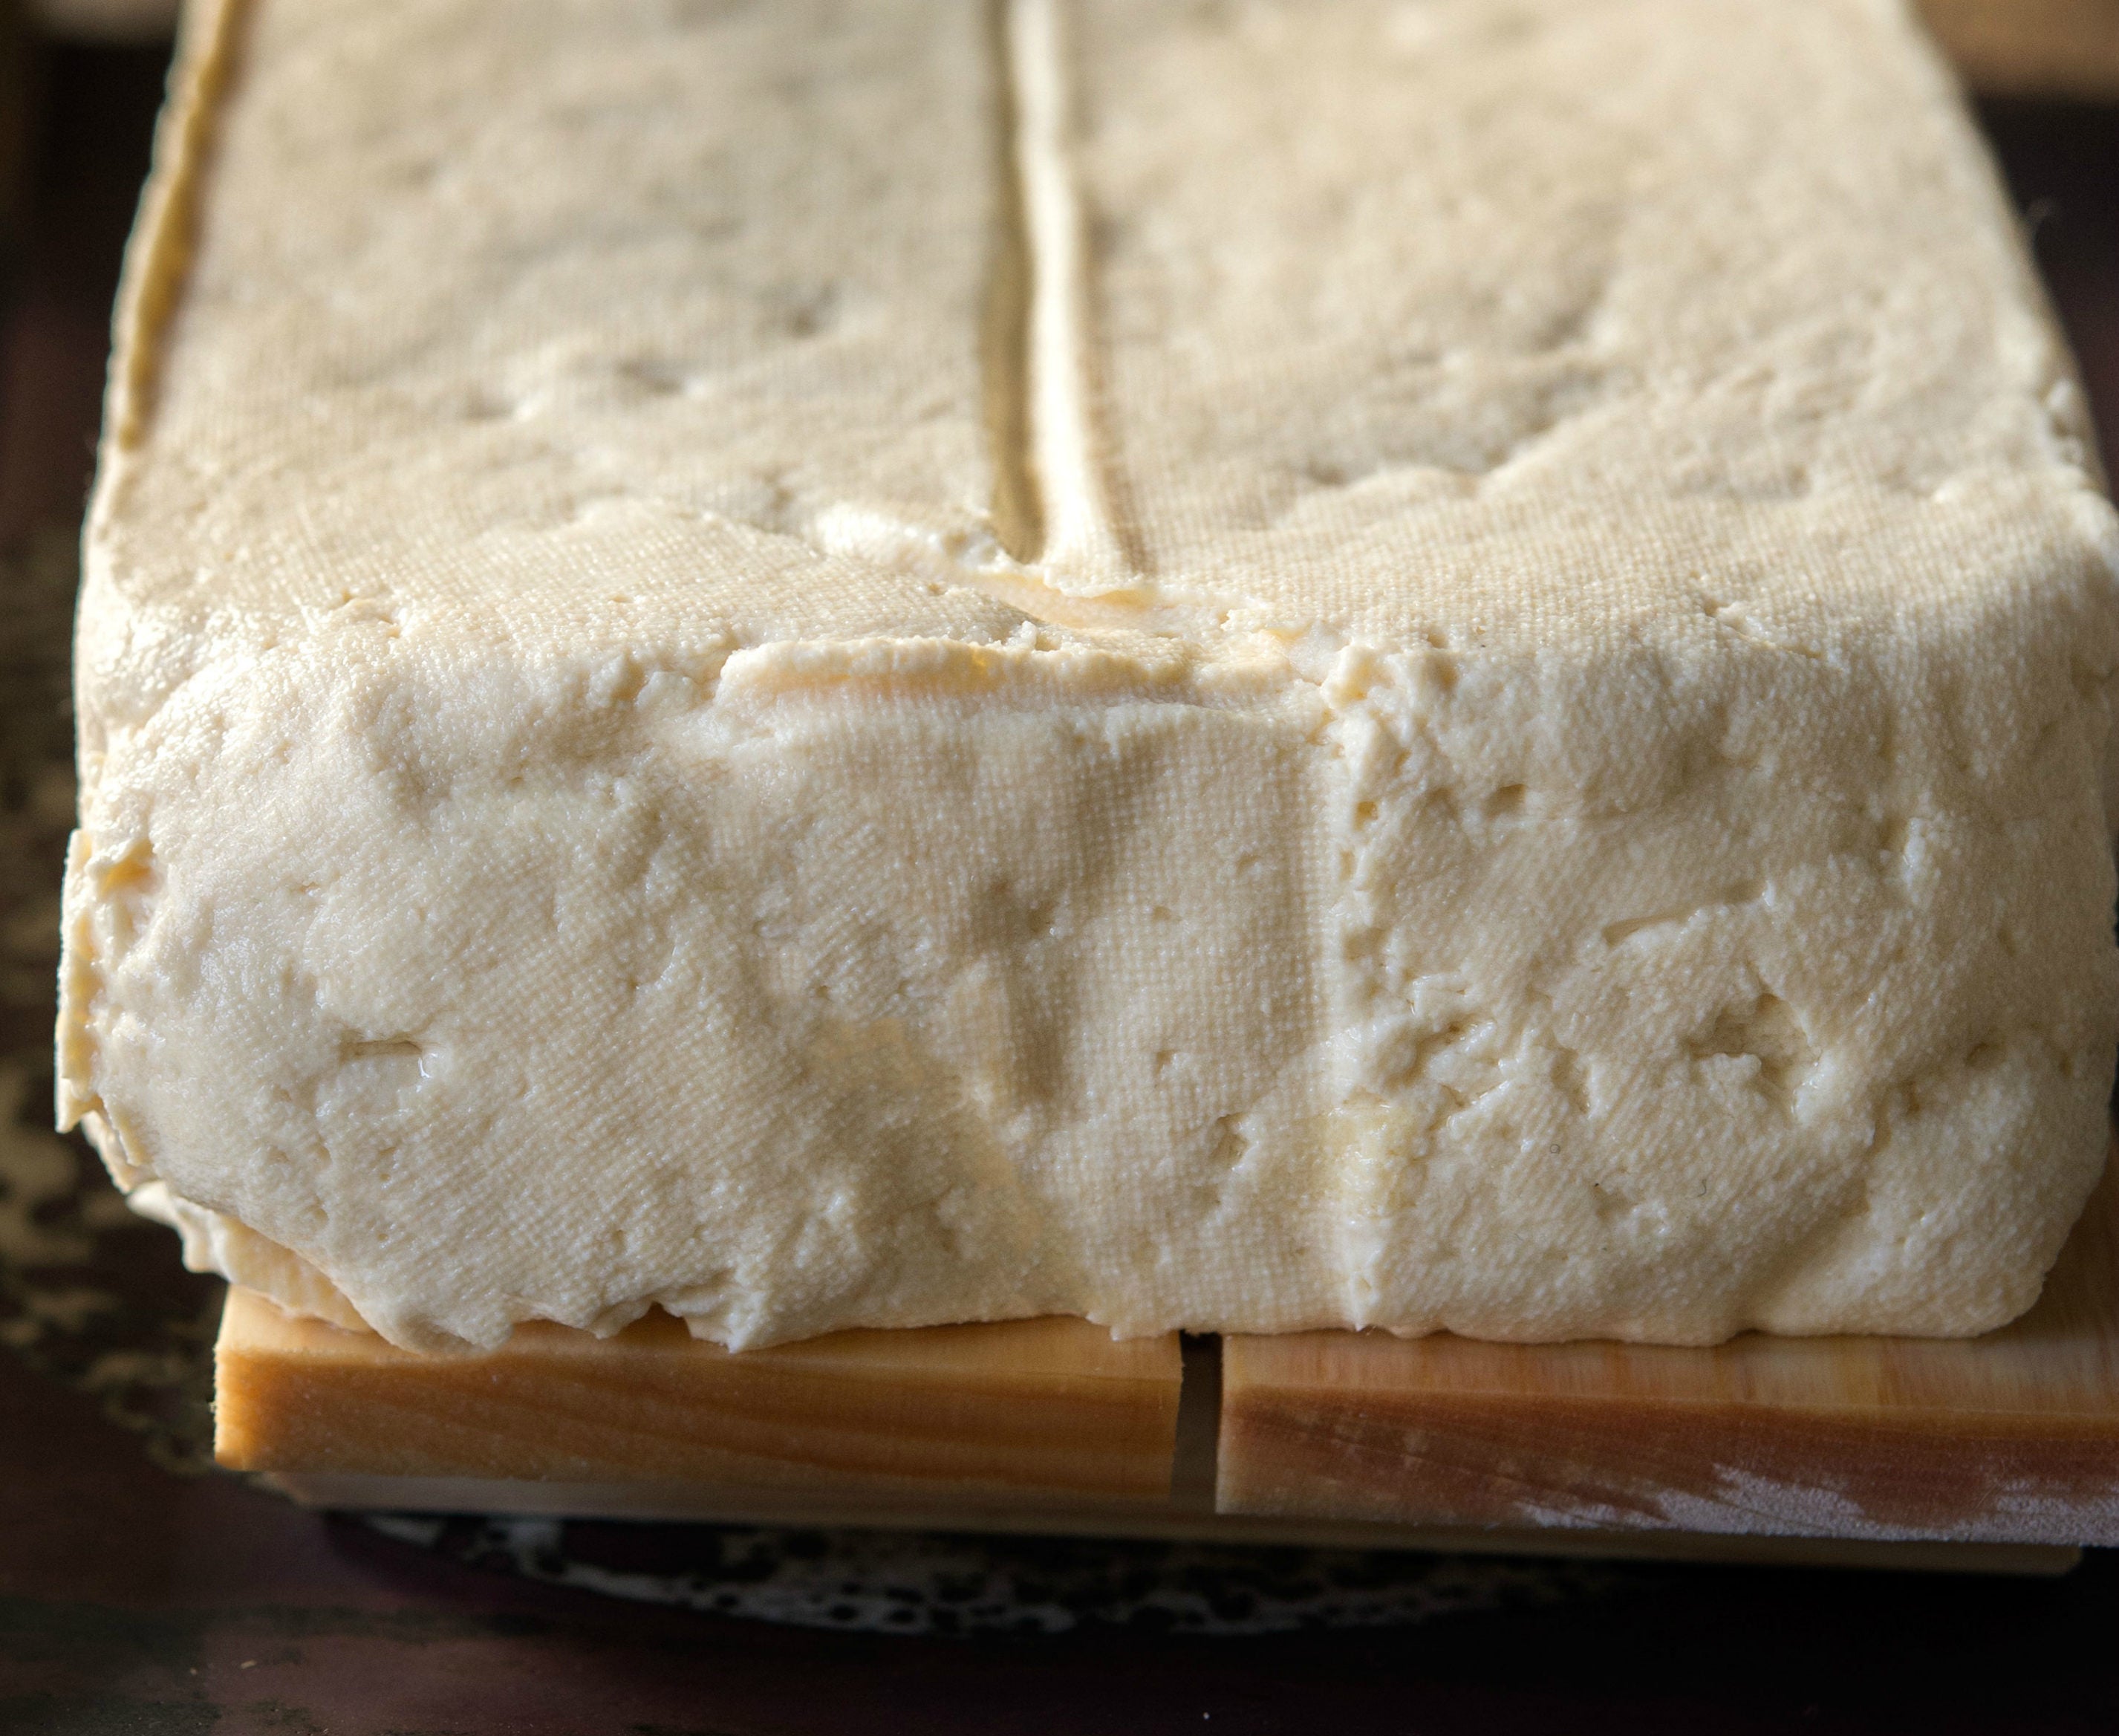
6. With a slotted spoon, gently ladle the curds and transfer them into the cloth-lined tofu mold. When you’ve ladled all the curds, fold the cloth over the top, set the mold lid on top (or a small plate, if using a colander), and place a weight, 1 to 1½ pounds, on top (depending if you want a medium or medium-to-firm tofu—canned goods work well as weights); the more weight and the longer you press the tofu, the firmer it will be. You can experiment with the duration and amount of weight, depending on how soft or firm you like your tofu.
7. Press the tofu for 15 minutes. Remove the weight. Carefully remove the tofu from the mold and unwrap. Submerge the tofu in cold water for 5 minutes. This allows the tofu to become firm.
8. Serve the tofu immediately, or store it in fresh, cold water in the refrigerator for up to a week, changing the water every other day.
Making soft, custardy silken tofu requires a different method than pressed tofu.
SILKEN TOFU
If you like an ultra-soft, custardy tofu, then you may prefer the silken variety. The process for making silken tofu is somewhat different than the one for pressed tofu outlined above. You still need to start with homemade soy milk, but instead of pressing the tofu, it’s steamed until set. For silken tofu, gypsum or calcium sulfate, rather than nigari, is recommended. Gypsum produces a more tender tofu. I found gypsum at a local home-brewing supply store (less than $2 for a 2-ounce container, which is plenty), or you can order online.
Ingredients
1½ teaspoons gypsum
2 teaspoons water, filtered or spring preferred
3 cups soy milk, chilled or at room temperature (avoid warm or hot soy milk, as it may cause the soy milk to curdle).
Directions
1. Stir together the gypsum and water.
2. Strain the soy milk through a fine mesh strainer to remove any lumps. Combine the soy milk and dissolved gypsum and stir to combine. Divide the soy milk amongst six 4-ounce ramekins or small heatproof bowls.
3. Bring an inch of water to a boil in a pan deep enough to accommodate the ramekins. When the water comes to a rolling boil, lower the heat to a simmer. Place the ramekins in the water. Place a small tea towel over the ramekins to prevent condensation from dripping into the ramekins. Cover and gently steam for 10 to 12 minutes, or until the tofu is set and has a jiggly, custardy texture.
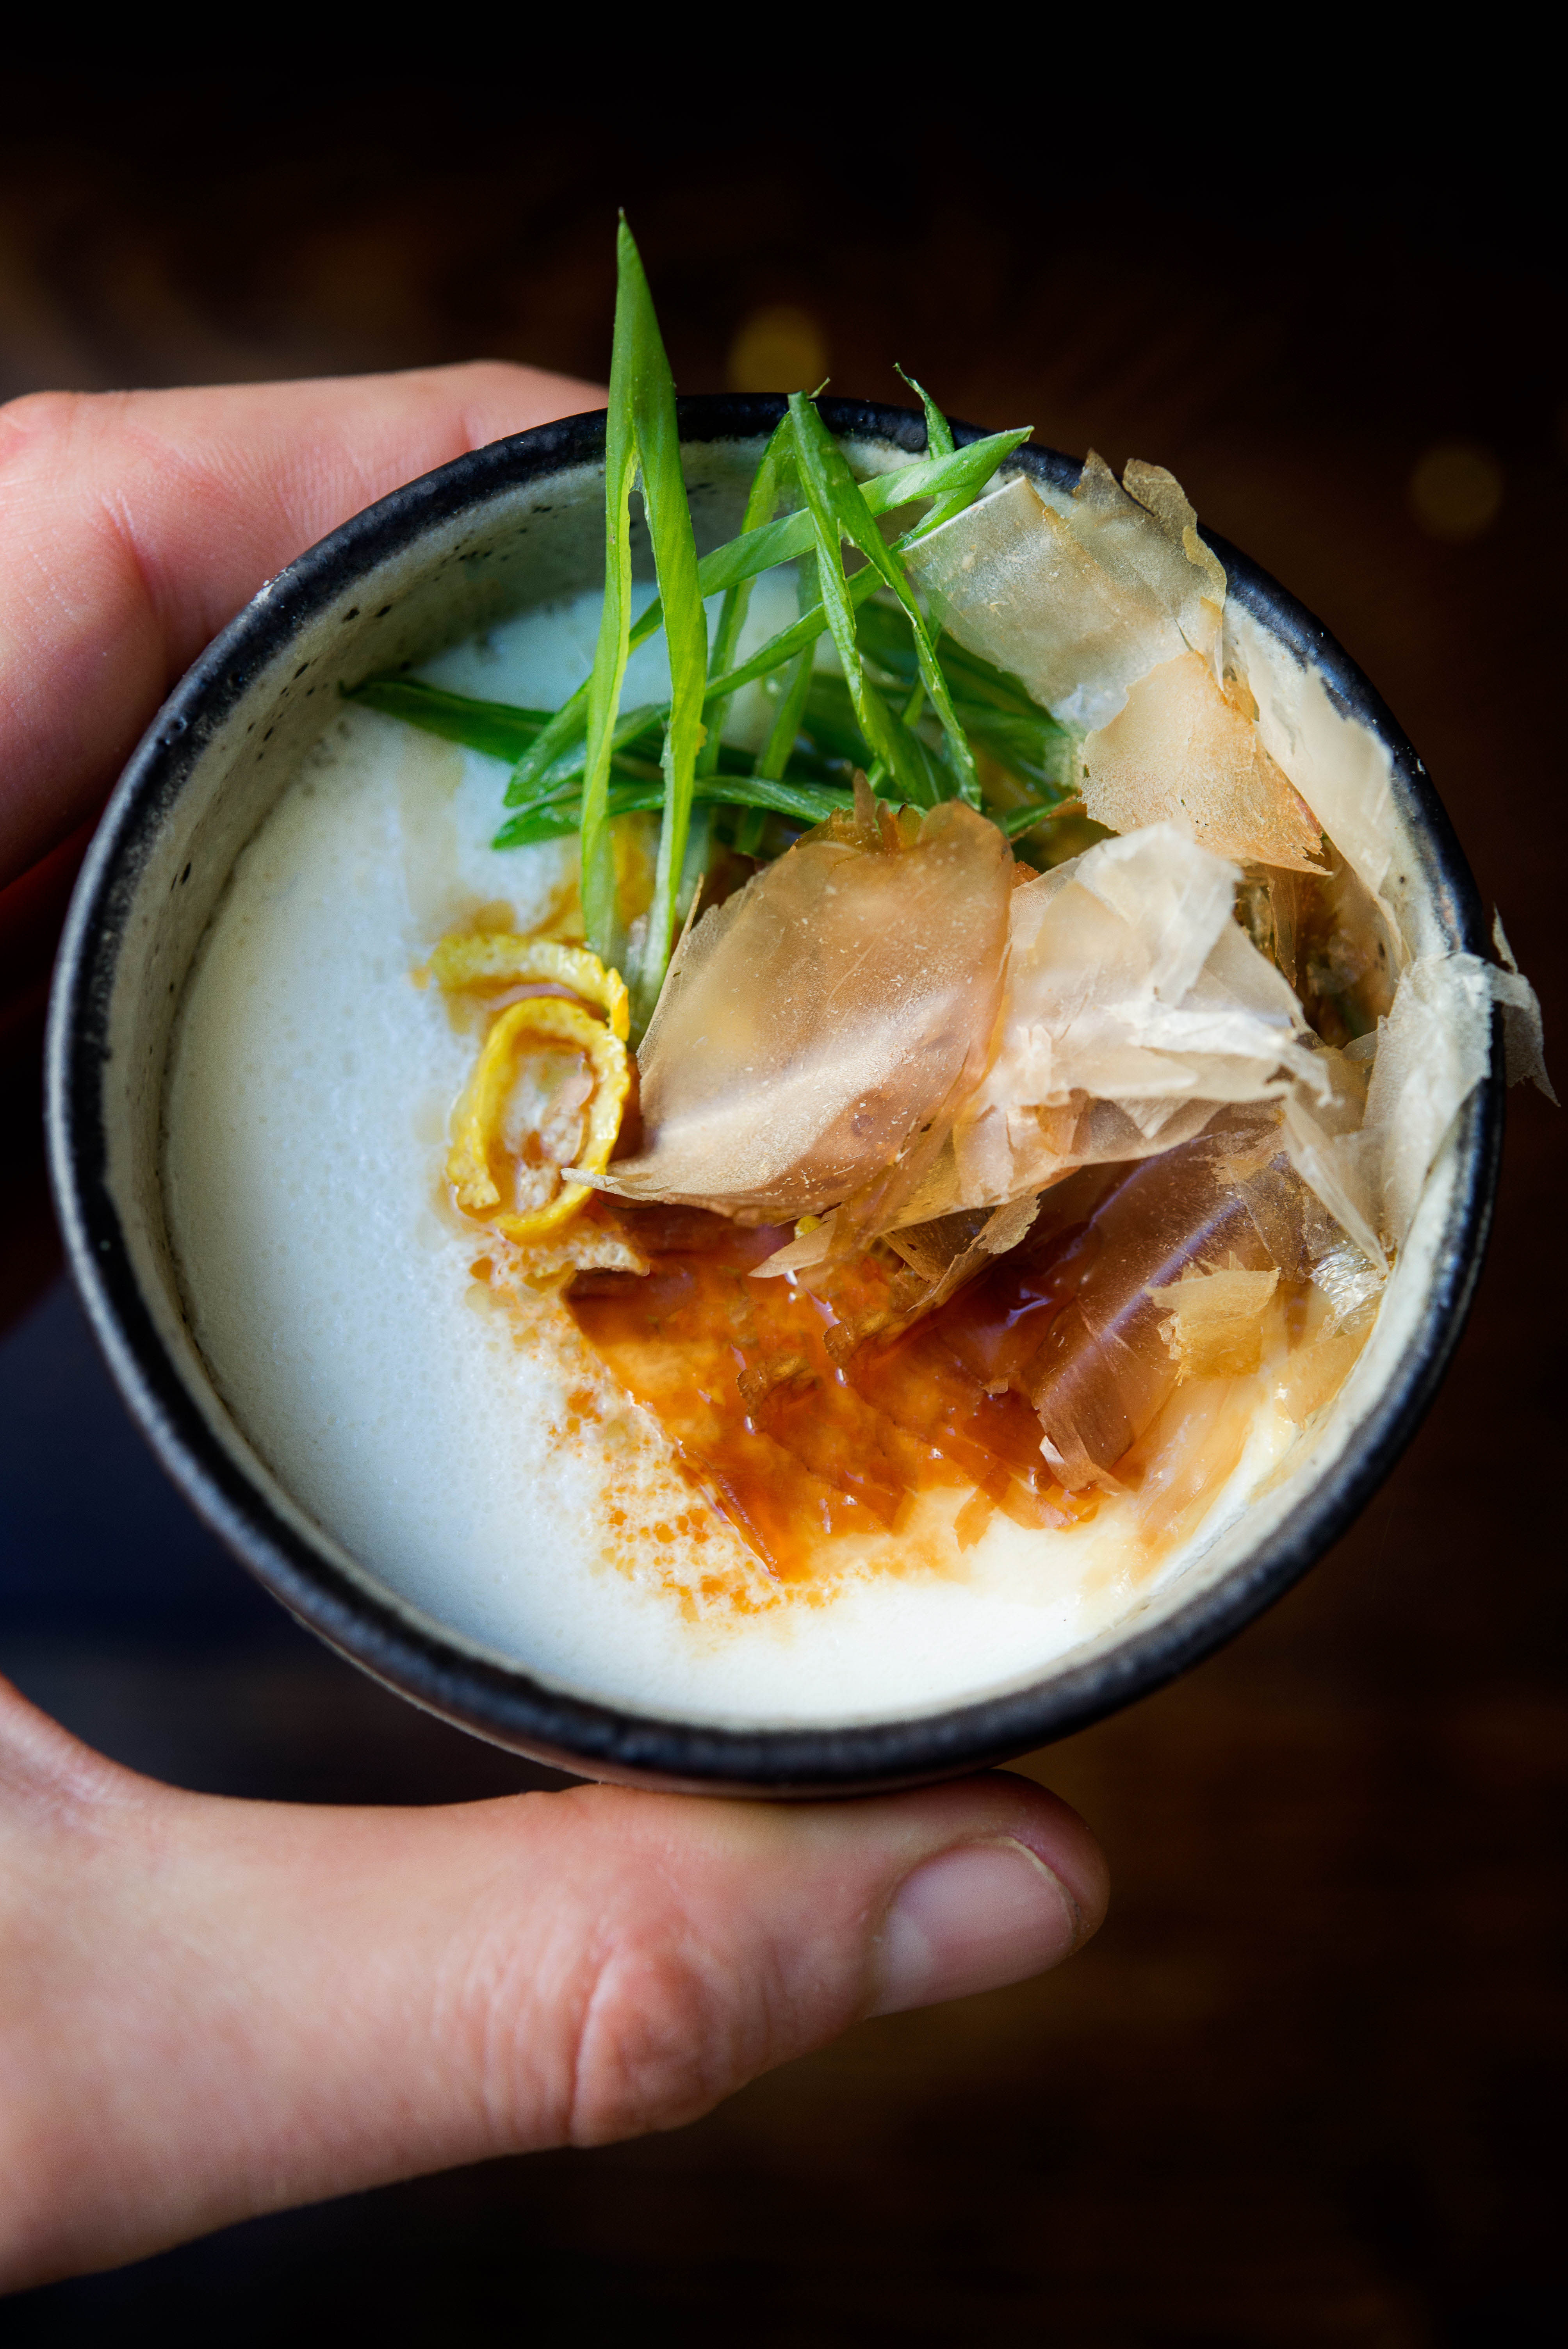
4. Remove the ramekins from the steamer and allow them to sit another 10 minutes at room temperature to firm up. Serve warm or chilled with soy sauce, thinly sliced green onions, bonito flakes, grated ginger, and/or lemon zest.
Soy curds are gently drained so they can be laid on a cloth-lined tofu mold and then pressed.
SOY MILK
The great thing about making your own soy milk is that it is free of preservatives and other unwanted ingredients, including sweeteners. With a mild, sweet, nutty flavor, homemade soy milk has considerably more flavor than the store-bought variety. It also costs a fraction of the price, since all you need to make soy milk are soybeans and water. The hardest part, at least for me, is remembering to soak my soybeans overnight.
Ingredients
6 ounces organic soybeans
8 cups spring/filtered water
Directions
1. Rinse the soybeans well with water. Place the soybeans in a large bowl. Add the spring water. Soak overnight at room temperature, 10 to 14 hours. The soybeans are ready when you pinch them and they split in half and the inside of the bean is smooth; if the inside of the bean is concave, soak longer and check again.
2. Drain, reserving the soaking liquid. Transfer the soybeans to a blender along with 2½ cups of the reserved soaking liquid. Blend until you have a smooth puree.
3. Heat 5 cups of the reserved soaking liquid in a large pot. When simmering, add the pureed beans to the pot.
4. Add ½ cup of the reserved soaking liquid to the blender, pulse, and add any puree remaining in the blender to the pot.
5. Cook the soy milk 8 to 10 minutes, stirring frequently, until the liquid starts to foam up. Turn off the heat and stir to deflate.
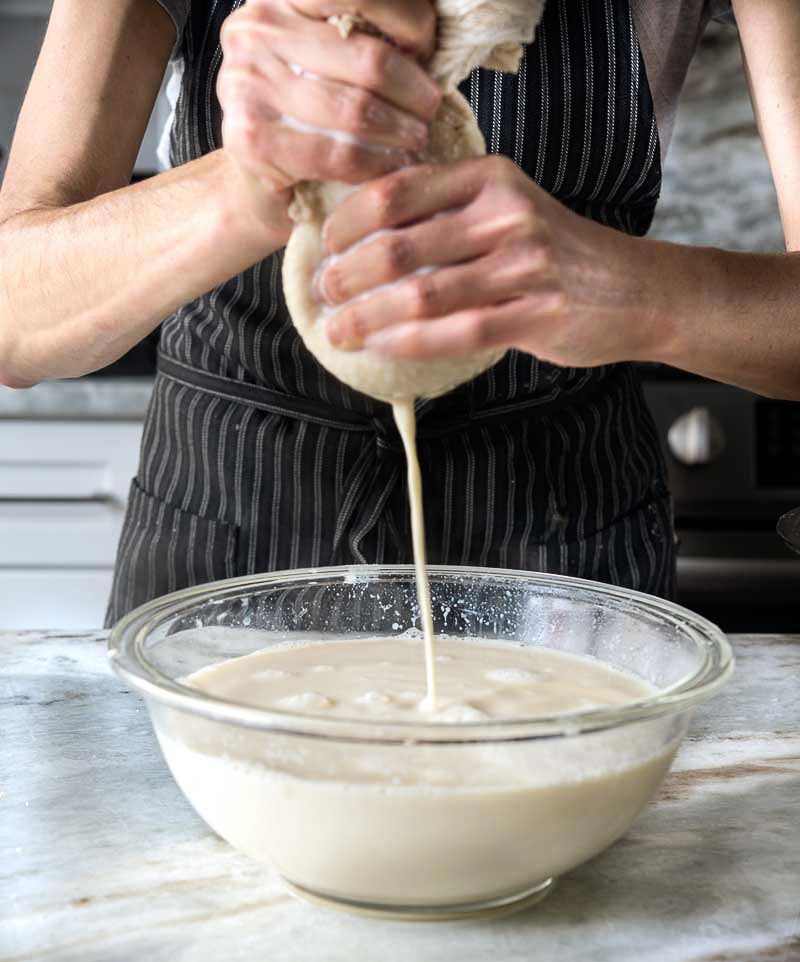
6. Place a colander lined with cheesecloth over a large bowl. Pour the soy milk into the colander. Pick up the cheesecloth, then gather and twist to form a sack (be careful, as it will be very hot; if too hot to handle, wait a few minutes). Continue to squeeze and press until all liquid (soy milk) has been removed. At this point you can make tofu or you can cool and chill the soy milk in the refrigerator for a few days in an airtight container until you’re ready to make tofu. As for the leftover soybean pulp, referred to as okara, it’s completely edible. Add it to veggie burgers, stir-fries, or soups or stews such as Korean biji-jjigae.
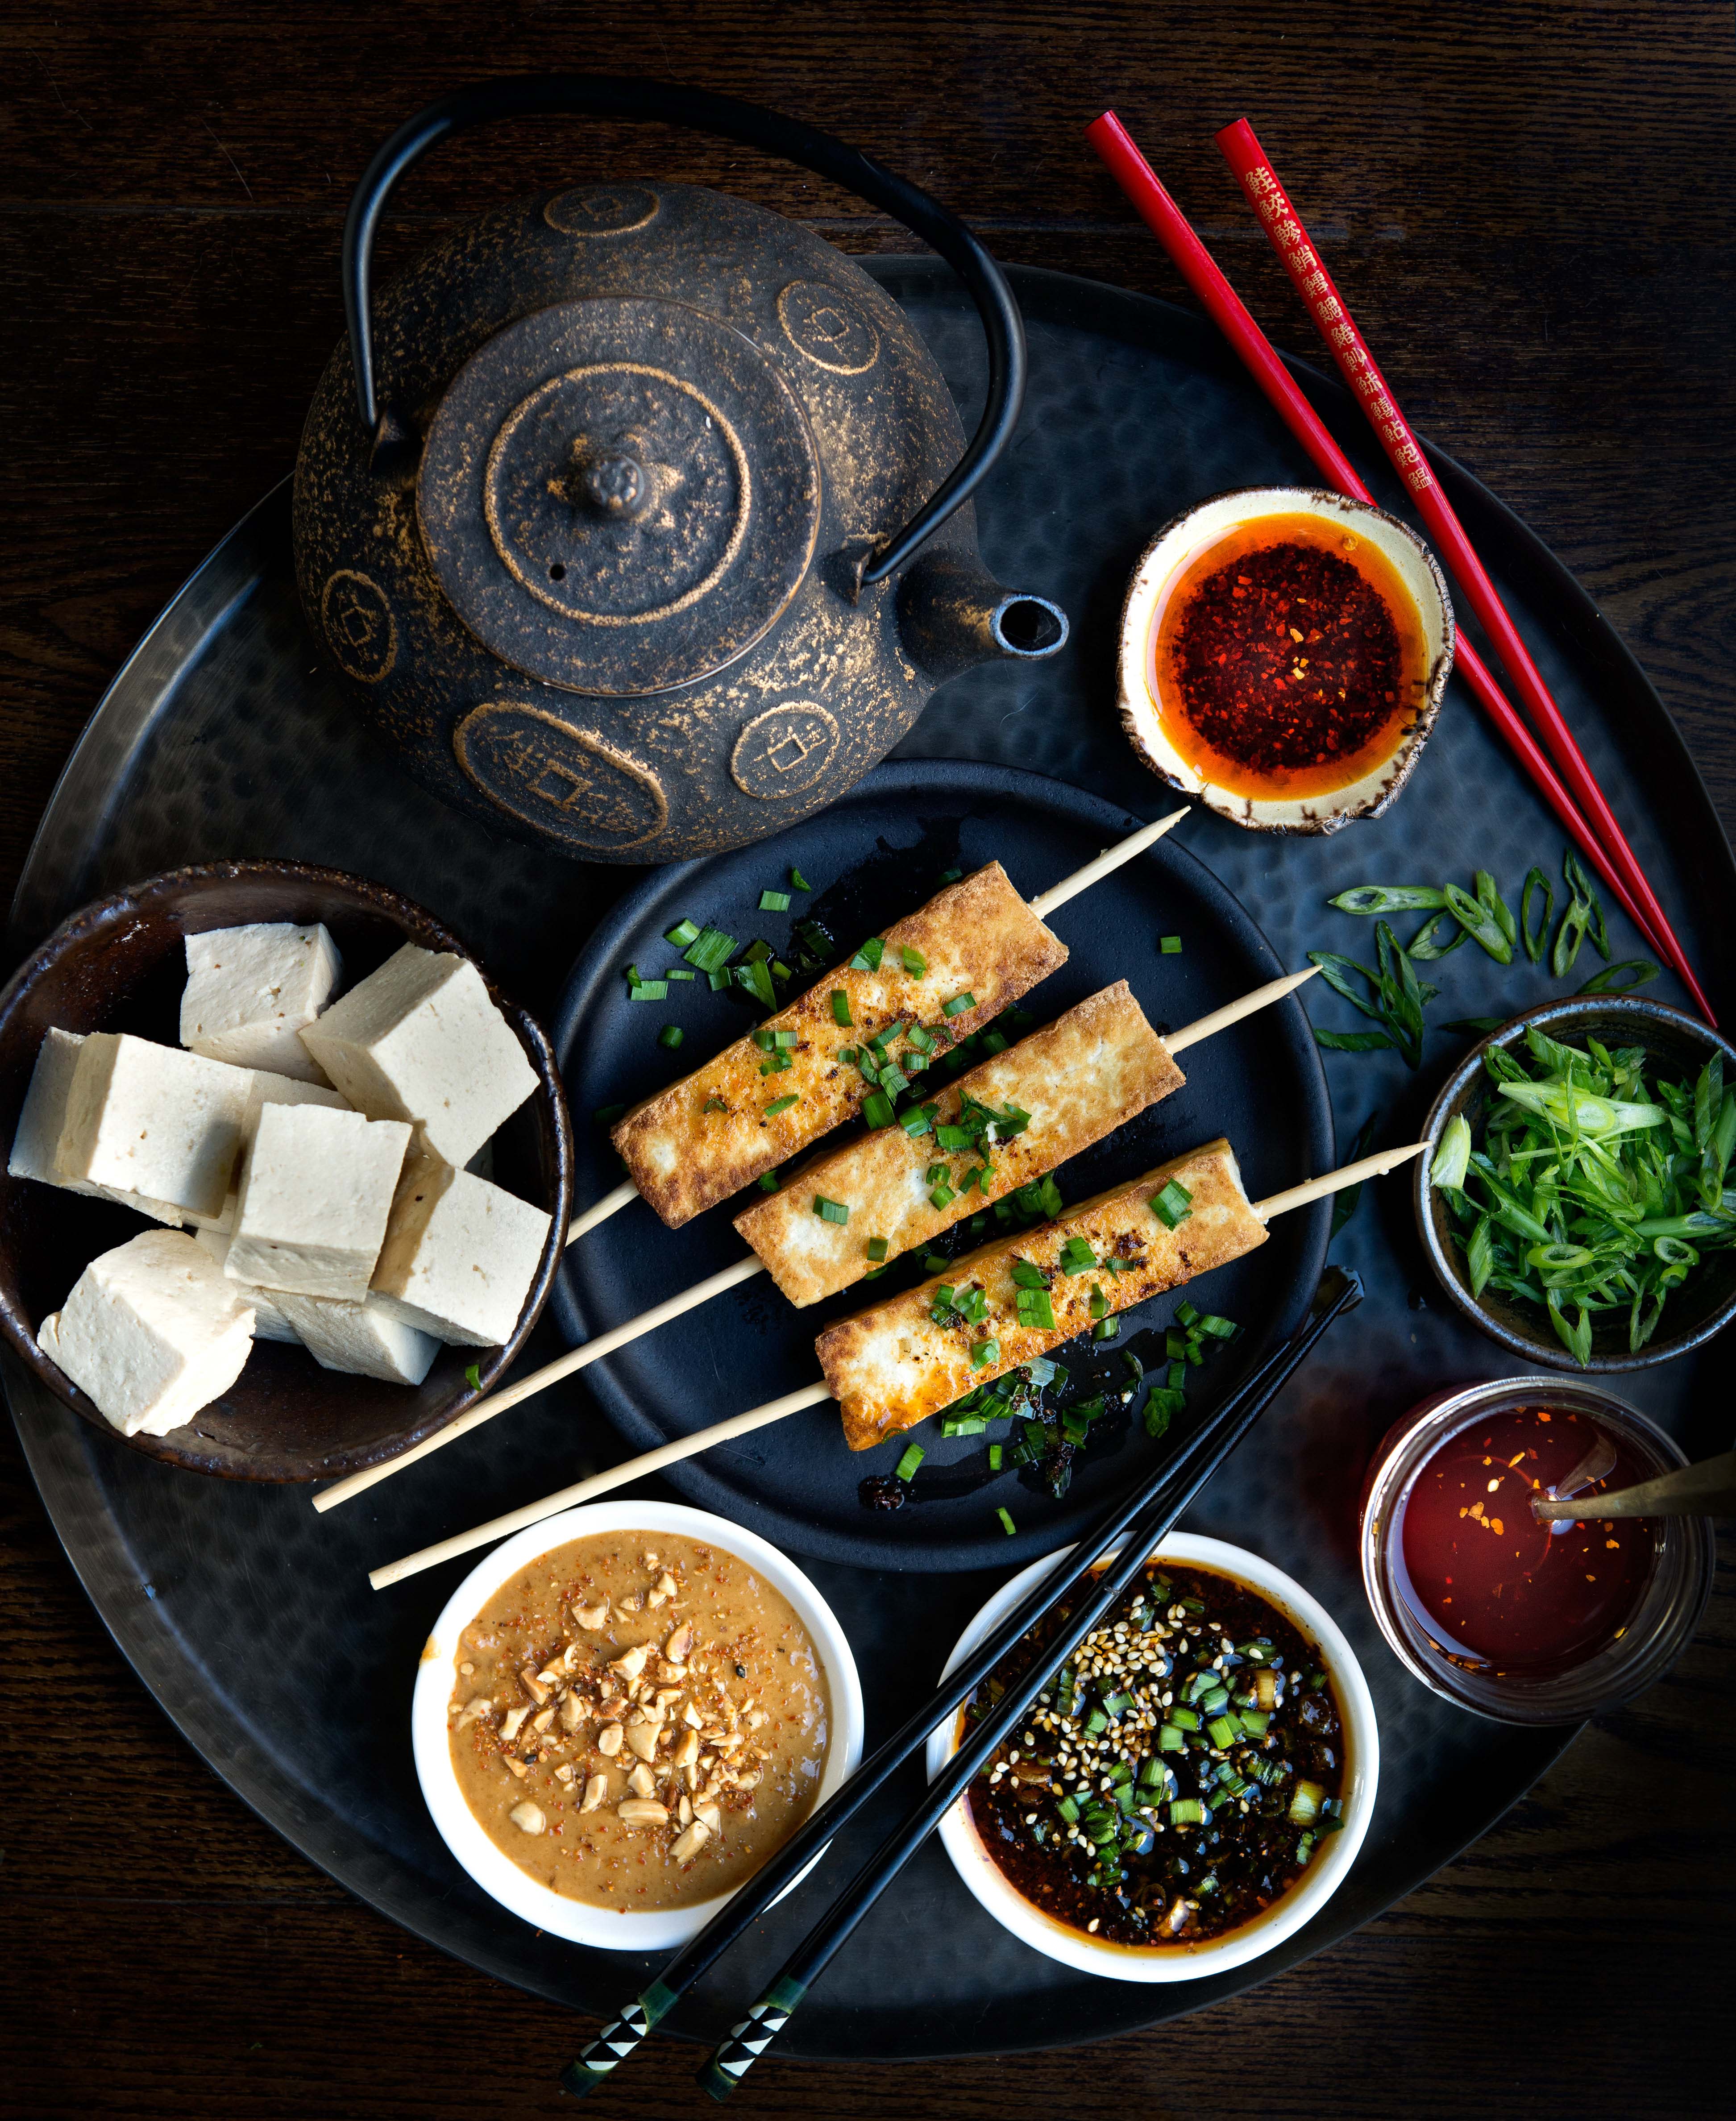
Tofu readily absorbs sauce, so make it count. Clockwise from top right: Toasted chile oil, soy-sesame-scallion dipping sauce, and peanut-sesame dipping sauce.
COOKING WITH TOFU
Because of tofu’s spongy nature and neutral flavor, it absorbs and pairs well with any number of sauces. It goes particularly well with three things: 1) A peanut-sesame dipping sauce, 2) a toasted chile oil, and 3) a soy-sesame-scallion dipping sauce. You can enjoy your homemade tofu immediately after being pressed alongside any or all of the dipping sauces, but I also like to crisp the tofu in a hot skillet until lightly golden on all sides.
Pan-Fried Tofu
Ingredients
1 block pressed tofu, drained well
2 teaspoons oil
Sea salt
Directions
1. Pat the tofu dry and slice into 1-inch cubes.
2. Heat the oil in a cast-iron or nonstick skillet over medium-high heat. When the oil is hot, add the tofu and sprinkle with salt. When the first side is brown, turn and cook on the other side. Continue to cook, turning the tofu, until all sides are crisp and golden brown, 8 to 10 minutes total.
Peanut-Sesame Sauce
Makes 3/4 cup
Ingredients
2 tablespoons peanut butter, smooth or chunky
2 tablespoons tahini
1½ tablespoons tamari (or soy sauce)
1 tablespoon neutral tasting oil (such as peanut)
1 teaspoon toasted sesame oil
2 tablespoons rice wine vinegar
¾ to 1 tablespoon honey, more or less to taste
1 garlic clove, grated
1 teaspoon grated fresh ginger
Pinch of cayenne or chile flakes to taste
Chopped peanuts (optional)
Directions
1. Whisk all ingredients together in a bowl. Add 1 tablespoon of warm water and whisk until smooth but not too loose. Transfer to a serving bowl and sprinkle chopped peanuts on top.
2. The peanut-sesame sauce can be made a few days in advance and refrigerated. Bring to room temperature before serving.
Chile Oil
Makes about 1 cup
Ingredients
¾ cup neutral oil (such as peanut, grapeseed, canola)
1/3 cup chile flakes (gochugaru, Korean red chili pepper powder)
1 tablespoon toasted sesame oil
Directions
1. Heat the oil in a small pot until it reaches between 225°F and 250°F. Add the chile flakes and take off the heat. Add the toasted sesame oil. Let the chile oil cool to room temperature for at least 2 hours. Ideally, let sit overnight before using.
Soy-Sesame-Scallion Sauce
Makes ½ cup
Ingredients
4 scallions, thinly sliced
2 small garlic cloves, crushed/grated
¼ cup tamari or soy sauce
2 teaspoons sesame oil
Red chile flakes to taste
Toasted sesame seeds for garnish
Directions
1. Combine the scallions, garlic, tamari/soy, sesame oil, and chile flakes in bowl. Whisk to combine. Garnish with sesame seeds.